Replacing a Power Supply Module
The following procedure describes how to replace the Power Supply module.
When using only one Power Supply module, the second AC power socket on the rear panel is covered by a plastic sticker. Please do not remove the sticker and connect anything to this power socket. Remove the sticker only when two Power Supply modules are used.
If the device is installed with two Power Supply modules, the Power Supply module that is not being replaced can remain connected to power, ensuring uninterrupted power supply to the chassis.
|
➢
|
To replace a Power Supply module: |
|
1.
|
Disconnect the power cord of the faulty Power Supply module from the power source, and then remove the power cord from the AC power socket on the rear panel. |
|
a.
|
On the front panel, loosen the two captive screws securing the module to the chassis, using your hand. |
|
b.
|
Grip the two captive screws and gently pull the module so that it completely slides out of the chassis slot. |
|
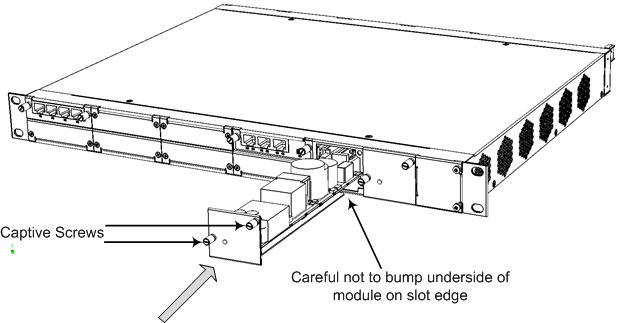
a.
|
Gently and carefully insert the module into the slot, by sliding the module along the slot's guiding rails and keeping the module lifted up towards the roof of the slot so that the base of the module does not touch the floor of the slot (and damage the electrical components located on the underside of the module). Slide the module into the slot until it makes contact with the card-edge connector located on the backplane. |
Inserting Power Supply Module (e.g., Secondary Power Supply Module)
|
b.
|
Finger-tighten the two captive screws on the module to secure the module to the chassis. |
|
4.
|
Connect the AC power cord to the power socket of the new Power Supply module and then connect the other end to the AC power source, as described in Section Connecting to Power. |